This is a writeup for some students in 161, because sometimes Slack just isn’t enough. 🙂
Ok, so you have your account set up. Now what? Keep in mind that public workspaces can be seen by anyone who knows your username and you only get one free private workspace. Since you’ll be doing schoolwork, you’ll want to use that private workspace for everything.
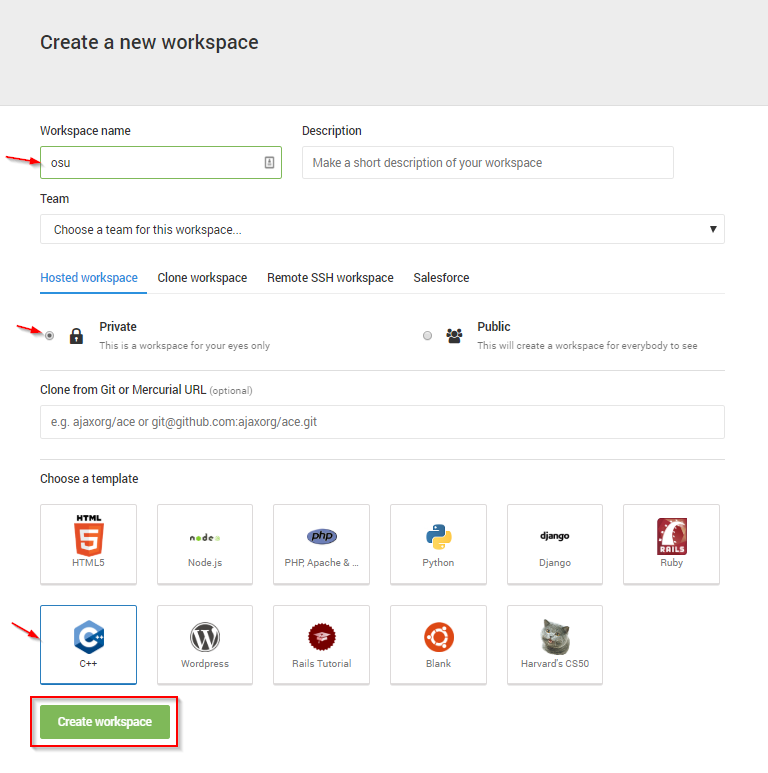
C9 Workspace Setup
Add a name for the workspace, set it to private, and choose a template. The template used just preinstalls a bunch of things for you, you’re not locked in to only using the workspace for that type of development in the future!
It will take a bit to create your new workspace. Sit tight, maybe go grab some coffee or something. When it comes up, you’ll see that it’s bright white. If you like that, great! If not, here’s how to make it a little easier on the eyes. Within settings, you can change the theme.

SSH Configuration
To make this a bit easier for yourself going forward, we’re going to set up your ssh config. You can either do this in vim or C9, but to show off a feature of C9, enter this in the terminal:
$ c9 ~/.ssh/configNow you’re going to add things to the file you just opened. I have four entries in mine for the school servers. I’m not going to post the server addresses here, will use a fake domain and server to reference them. As you might know, there are three servers that you can connect to, the first represents the one that will just place you on one and the others are direct connections. There’s probably a way to set up rules for this so they wouldn’t all need to be done separately but it’s not something I’ve looked into. 🙂
Host foo
  HostName all.bar.com
  User sarah

Host foo1
  HostName foo1.bar.com
  User sarah

Host foo2
  HostName foo2.bar.com
  User sarah

Host foo3
  HostName foo3.bar.com
  User sarah
Then to use this, instead of typing out the full connection you can just do something like this for the host you want to connect to:
$ ssh fooGit Setup
Everything you do in cloud 9 should be backed up using git and cloned from a remotely hosted repository. It isn’t necessarily the most stable environment since it was transitioned to AWS and I’ve had several occasions where I’ve fixed bugs in my programs and had them reappear within the hour because my changes did not persist. Commit and push frequently!
Create Remote Repository
Now that that’s done, you can work on setting up git repositories. For simplicity, I would recommend setting one up on a remote hosting service first and cloning that into c9. If you want to use GitHub, you will need to get the student developer pack for unlimited free private repos. Most of my coursework is on Bitbucket, which allows me unlimited free repos, nice team features, and more control over granting access. Gitlab is also nice, especially if you’d like to host your own. Any of these would be fine, but I’ll keep the links to Bitbucket and GitHub. Once you’re set with an account, you should create a private repository.
Bitbucket: https://confluence.atlassian.com/bitbucket/create-a-git-repository-759857290.html
GitHub: https://services.github.com/on-demand/github-cli/create-remote-repository
Clone Remote Repository Locally
Once you have the repo created, you’ll want to clone it in c9. There are two options, SSH and HTTPS. SSH allows you to NOT have to enter your username and password every time, but that’s a tutorial for another day, unless you feel so inclined. 🙂
Bitbucket: Steps 4 and 5 here show you where to find the address for cloning. https://confluence.atlassian.com/bitbucket/copy-your-git-repository-and-add-files-746520876.html
GitHub: https://services.github.com/on-demand/github-cli/clone-repo-cli
When you clone, it will create a directory with the name of the repo or a name you provide, such as:
$ git clone https://username@bitbucket.org/username/reponame.git dirnameThe next step is then to use your terminal to go into the repository folder.
If you provided the directory name:
$ cd dirname….or if you didn’t provide a directory name:
$ cd reponameYou should see your terminal prompt change to now show (master) at the end. This is not default behavior everywhere, but it’s already preconfigured for you within cloud 9 and it’s awesome. If you’re curious, it’s PS1 in ~/.bashrc that controls this. Now that you’re in the folder, you’re ready to go! Add files to the folder as you wish. Once you have made some edits, you’ll want to commit them to version control and back them up to the remote repo:
$ git add .
$ git commit -m "some message describing your committed changes"
$ git push
If you have worked on it elsewhere, you can do this to bring in the changes:
$ git pullThere’s a bunch more to get into, but that’s about all I have time for tonight. I have a teammate to work with on our capstone project tonight. 😀