New SSD!

I’ve been using a hand me down 64 GB SSD for Fedora as what started as just a trial run, but quickly became my primary driver. I decided it was time for a new one and with the prices of NAND being so great, why not get an M.2 NVMe drive since my board had the slot for it?Β What’s the worst that could happen? A whole lot of frustration and many more hours involved than expected. I also waited more than Newegg’s 30 day return policy to get around to installing it – pro tip, don’t do that. πŸ˜›

What I was working with:
Dell XPS 8920
Fedora
Intel 660p Series M.2 PCIe NVMe

If you want the quick version of what to do, scroll down to the end. If you want to understand a bit more of why and how to diagnose some of these issues yourself, please read on. πŸ™‚

It started out simple enough. My case was super easy to open (once I checked youtube to learn I had to PULL the top thing to release it) and the power supply housing folds up once you get it open. Very interestingly designed case. I was very annoyed to learn that there is NOT a screw that came with the motherboard – just the spacer.Β  Make sure your drive is level upon install! If you try to use the spacer as a screw it will not be. Let’s not get into why I know this…

Showed up in BIOS as what it was – cool, must be fine. Nope, was not recognized by Fedora installer.

After a short eternity of boot time, it was recognized in Windows. I was forced to choose MBR or GPT. Chose MBR since that was recommended for my drive size, but later found Dell docs demanding GPT so I converted it. Still nothing in linux.

Flashed BIOS to version 1.0.19. Still nothing.

In my existing Fedora install, I tried these commands from an Intel post and finally learned it was in the kernel but not loaded: https://itpeernetwork.intel.com/finding-your-new-intel-ssd-for-pcie-think-nvme-not-scsi/#gs.cge64j
modinfo nvme
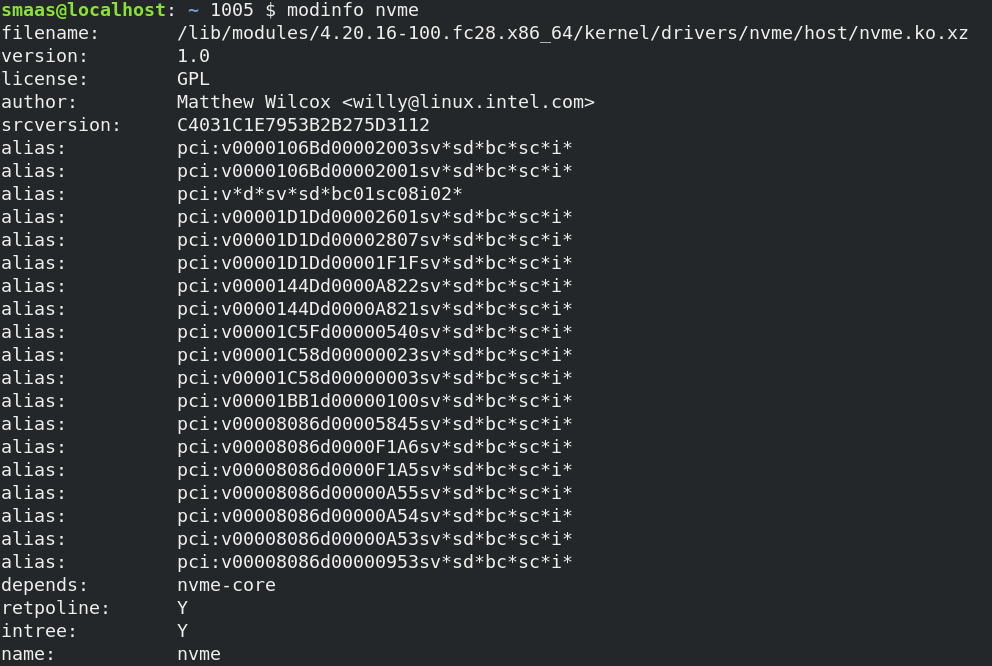
lsmod | grep nvm
Nothing listed, so it’s not loaded.

Tried some other internal docs too, to no avail πŸ˜‰

Eventually learned this is how to load: https://docs.fedoraproject.org/en-US/Fedora/14/html/Deployment_Guide/sec-Loading_a_Module.html
sudo modprobe nvme

Now when I run this I have entries:
lsmod | grep nvm

Still no good, does not show up here:
ll /dev/nvme*

At this point I gave up and walked away for a week to regroup and really figure out if there was a hardware incompatibility issue. I was pretty sure there wasn’t since the drive had been recognized by Windows just fine. I checked it out with Intel health and update tools from their website on Windows. It’s just not recognized by any linux I’ve tried. Why?
It turns out it’s that my BIOS was set to RAID, which, despite being older technology, is not supported for NVMe drives. People have claimed that theirs worked with RAID, but most were AHCI. I was able to switch it over with no event – except that suddenly everything appeared. πŸ™‚ Fedora loaded the nvme module on its own:

I was hopeful, so next I checked if they were indeed mapped:

And last, it now shows up as a disk:

I now have a prayer of successful installation!!

TLDR

Relevant Machine Specs

Dell XPS 8920
Intel Corporation 200 Series/Z370 Chipset Family

NVMe SSD

Intel 660p Series M.2 2280 1TB PCIe NVMe 3.0 x4 3D2, QLC Internal Solid State Drive (SSD) SSDPEKNW010T8X1

OS

Fedora Workstation 30

Hardware Installation Process

  1. Buy a damn screw.
  2. Insert drive in the slot.
  3. Secure with the screw.
  4. Verify by booting into BIOS and seeing that it’s recognized.

Linux Installation Process

  1. Flash BIOS to newest version. May not be necessary but it’s a good idea anyway.
  2. Make sure BIOS is set to AHCI. If not, switch and verify that everything still boots correctly.
  3. Boot into linux – either existing drive or live USB.


Resources

https://ark.intel.com/content/www/us/en/ark/products/149407/intel-ssd-660p-series-1-0tb-m-2-80mm-pcie-3-0-x4-3d2-qlc.html
->
https://downloadcenter.intel.com/download/28749?product=149407

https://www.nvmedeveloperdays.com/English/Collaterals/Proceedings/2018/20181204_PRECON2_Hands.pdfhttps://richardstechnotes.com/2015/12/18/setting-up-an-nvme-ssd-on-ubuntu-14-04-lts/

Setting up an NVMe SSD on Ubuntu 14.04 LTS

https://www.dell.com/support/article/us/en/04/sln312382/nvme-on-rhel7?lang=en


Git Networking with SSH

It’s only been about a year since I started writing up some workspace configuration for C9 here:Β Starting out with C9 for developmentΒ ?Β After fighting with it for about a week at work and getting very frustrated with what I could find on the internet, I’m back to document some more!

Git Network Integration

A selling point of git as version control is that you can have local copies of a repository everywhere without a single source of truth or “central repo”. But how do you manage that without making a giant mess? Usually there’s still a golden source. Say you’re working on someone’s open source project on github. You have your own clone of it, but if you’re working off master you’ll eventually run into some snags if you don’t keep it as a clean copy of the origin. I have many opinions on good workflows for git, but that’s a discussion for another day. πŸ˜› However, this came up because I wanted to be able to pull changes back and forth between local copies without using a central server copy. I knew this should be possible with git remotes but ran into some real pains between Linux and Windows. If you want to do this just trust me when I say you want to go ahead and get an ssh server running on Windows, whether it be through OpenSSH Server natively in Windows or through Windows Subsystem for Linux.

Generate SSH Keys

It’s likely you have done this if you’ve set up a git repo, but first you’ll want to check if you have ssh keys already:

$ ls -lsa ~/.ssh

If you already have keys set up, they will show up as something like id_rsa and id_rsa.pub. If you do not have both, regenerate them. Run this to generate keys and follow the prompts on screen:

$ ssh-keygen -t rsa

SSH Configuration

This is incredibly powerful and I would never want to set up git remotes to anything on a local network without it. Imagine having several repositories that are all linked to the same user@hostname:port and you needed to change that at all? Oh, the horror! Instead, save yourself the trouble and just use a host config on each machine. Open your ssh config file:

$ vim ~/.ssh/config

Here’s an example of a full config in a couple of different cases. Sometimes you need to run your ssh server under something other than the default port of 22, so then the port needs to be specified:

Host foo
  HostName foo.bar.com
  User sarah

Host baz
  HostName baz.bar.com
  User sarah
  Port 5000

SSH Key Authentication

Oh how I wish I had looked into this long ago. Whenever looking for any configuration docs, it’s always a good idea to add DigitalOcean to your search string. Today I quickly found there how easy it can be to use your existing ssh keys to set up passwordless ssh login. You’ll need to run this command on each of your machines you want to link:

$ ssh-copy-id user@hostname:port

Even better, if you have set up the ssh config for this host like I’ve suggested, you can just use your host alias:

$ ssh-copy-id host

If you used something other than id_rsa, you may need to add -i with the identity filename.

Just like that, you can now ssh without passwords!

This is supposed to be about Git

Ok, but how do we use all of these things for git? This is where it gets fun. πŸ˜€ Whether your machines are on a local network or not, as long as you have ssh configured and working you are ready to connect your git repository copies!

On host “baz” from our ssh dummy configs:

$ git remote add ssh://foo/absolute/path/to/repo

If you don’t already know the absolute path, you can run the command pwd on the host from within the main folder of the repo.

To verify this worked:

$ git fetch foo

You can also see the full remote with this:

$ git remote -v

If this didn’t work and you messed up the path, you can always remove the remote and try again:

$ git remote remove foo

Repeat for your other host(s) and now your repository copies are linked!

The next problem that comes up is how to work between them but that’s personal preference between rebase and pull. For example, rebase would look like this with the remote and branch specified:

$ git rebase foo/master

I wouldn’t recommend using rebase until you’re very familiar with how it works but if you mess up, git reflog is your friend!

Starting out with C9 for development

This is a writeup for some students in 161, because sometimes Slack just isn’t enough. πŸ™‚

Ok, so you have your account set up. Now what? Keep in mind that public workspaces can be seen by anyone who knows your username and you only get one free private workspace. Since you’ll be doing schoolwork, you’ll want to use that private workspace for everything.

C9 Workspace Setup

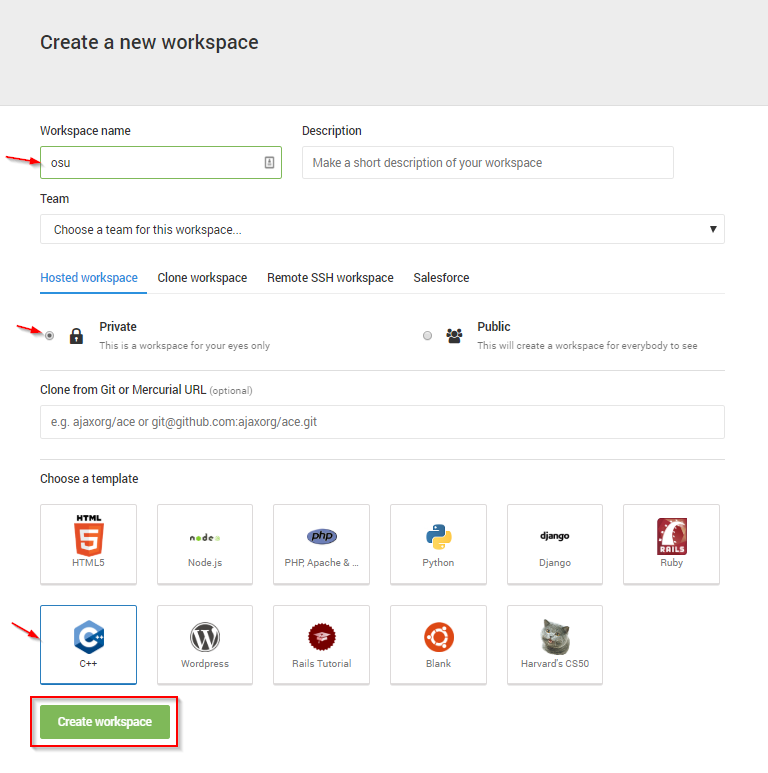
Add a name for the workspace, set it to private, and choose a template. The template used just preinstalls a bunch of things for you, you’re not locked in to only using the workspace for that type of development in the future!

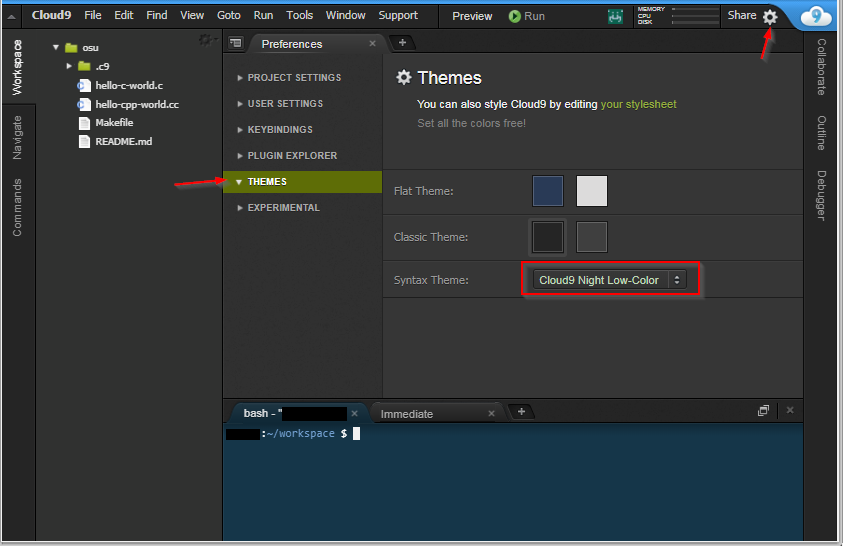
It will take a bit to create your new workspace. Sit tight, maybe go grab some coffee or something. When it comes up, you’ll see that it’s bright white. If you like that, great! If not, here’s how to make it a little easier on the eyes. Within settings, you can change the theme.

SSH Configuration

To make this a bit easier for yourself going forward, we’re going to set up your ssh config. You can either do this in vim or C9, but to show off a feature of C9, enter this in the terminal:

$ c9 ~/.ssh/config

Now you’re going to add things to the file you just opened. I have four entries in mine for the school servers. I’m not going to post the server addresses here, will use a fake domain and server to reference them. As you might know, there are three servers that you can connect to, the first represents the one that will just place you on one and the others are direct connections. There’s probably a way to set up rules for this so they wouldn’t all need to be done separately but it’s not something I’ve looked into. πŸ™‚

Host foo
  HostName all.bar.com
  User sarah

Host foo1
  HostName foo1.bar.com
  User sarah

Host foo2 
  HostName foo2.bar.com
  User sarah

Host foo3
  HostName foo3.bar.com
  User sarah

Then to use this, instead of typing out the full connection you can just do something like this for the host you want to connect to:

$ ssh foo

Git Setup

Everything you do in cloud 9 should be backed up using git and cloned from a remotely hosted repository. It isn’t necessarily the most stable environment since it was transitioned to AWS and I’ve had several occasions where I’ve fixed bugs in my programs and had them reappear within the hour because my changes did not persist. Commit and push frequently!

Create Remote Repository

Now that that’s done, you can work on setting up git repositories. For simplicity, I would recommend setting one up on a remote hosting service first and cloning that into c9. If you want to use GitHub, you will need to get the student developer pack for unlimited free private repos. Most of my coursework is on Bitbucket, which allows me unlimited free repos, nice team features, and more control over granting access. Gitlab is also nice, especially if you’d like to host your own. Any of these would be fine, but I’ll keep the links to Bitbucket and GitHub. Once you’re set with an account, you should create a private repository.
Bitbucket:Β https://confluence.atlassian.com/bitbucket/create-a-git-repository-759857290.html

GitHub:Β https://services.github.com/on-demand/github-cli/create-remote-repository

Clone Remote Repository Locally

Once you have the repo created, you’ll want to clone it in c9. There are two options, SSH and HTTPS. SSH allows you to NOT have to enter your username and password every time, but that’s a tutorial for another day, unless you feel so inclined. πŸ™‚

Bitbucket: Steps 4 and 5 here show you where to find the address for cloning.Β https://confluence.atlassian.com/bitbucket/copy-your-git-repository-and-add-files-746520876.html

GitHub:Β Β https://services.github.com/on-demand/github-cli/clone-repo-cli

When you clone, it will create a directory with the name of the repo or a name you provide, such as:

$ git clone https://username@bitbucket.org/username/reponame.git dirname

The next step is then to use your terminal to go into the repository folder.

If you provided the directory name:

$ cd dirname

….or if you didn’t provide a directory name:

$ cd reponame

You should see your terminal prompt change to now show (master) at the end. This is not default behavior everywhere, but it’s already preconfigured for you within cloud 9 and it’s awesome. If you’re curious, it’s PS1 in ~/.bashrc that controls this. Now that you’re in the folder, you’re ready to go! Add files to the folder as you wish. Once you have made some edits, you’ll want to commit them to version control and back them up to the remote repo:

$ git add . 
$ git commit -m "some message describing your committed changes"
$ git push

If you have worked on it elsewhere, you can do this to bring in the changes:

$ git pull

There’s a bunch more to get into, but that’s about all I have time for tonight. I have a teammate to work with on our capstone project tonight. πŸ˜€

Colors!

Colored console output wasn’t something I ever really explored until this quarter, so I thought I’d share how easy it actually is and how I’ve set it up to be simpler for me and easier to read!

These are the codes I’ve set up:

#define SET_BOLD_RED        "\033[1;31m"
#define SET_RED             "\033[0;31m"
#define SET_BOLD_GREEN      "\033[1;32m"
#define SET_GREEN           "\033[0;32m"
#define SET_BOLD_YELLOW     "\033[1;33m"
#define SET_YELLOW          "\033[0;33m"
#define SET_BOLD_BLUE       "\033[1;34m"
#define SET_BLUE            "\033[0;34m"
#define SET_BOLD_MAGENTA    "\033[1;35m"
#define SET_MAGENTA         "\033[0;35m"
#define SET_BOLD_CYAN       "\033[1;36m"
#define SET_CYAN            "\033[0;36m"
#define RESET_COLOR         "\033[0m"

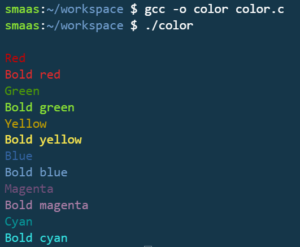
To use them, you want to “print” them to the console. So to make something red, I’d print SET_RED, then the text, then RESET_COLOR to set it back to normal. Pretty simple and most importantly, readable!

printf("%sRed%s\n", SET_RED, RESET_COLOR);

Bad quality screenshot example πŸ™‚

Source I learned from:

Adding Color to Your Output From C

What’s Overleaf?

Recently I found myself needing to update my resume with a new project. No big deal, right? It’s a little harder when your resume template as of the last 9 years has been in Microsoft Word and you’re now primarily running linux. What to do? Surely I don’t want to have to reboot into Windows every time and it was overdue for a redesign anyway. Enter recommendations for Overleaf. πŸ™‚ Overleaf is an online editor with tons of templates for LaTeX. Even after picking out some templates to try though, it wasn’t working quite how I wanted. LaTeX was new to me and working in some pretty finicky templates was set aside for later.

Last week a friend of mine asked us to look over her resume and we decided it was great content but it lacked style. I recreated it with a template we liked that’d nicely handle having 3 degrees. Of course I couldn’t stop then and had to do mine next. By the time I was done, I had enough of a grasp on latex to be able to alter the template code to fit my needs…and design ideas. ? I finally have something I really love and am not just tolerating until I figure out something better.

Go ahead, try it out yourself. πŸ˜€ Try different templates until you find one that fits!

Quotes from my day

Development Workflow

  1. Make it work.
  2. Make it pretty.
  3. Make it fast.

Project Management Triangle

Fast delivery, high quality, low cost: you can only have two.

The business intelligence version: fast loading, large quantities, real time data.

* I did not come up with these, only paraphrasing. ?

How do I efficiently calculate primes?

* Disclaimer: I have tested none of this code yet. Please do share if you find a syntactic error here. πŸ™‚ I’m trying to practice my ability to write code without an editor and without testing every little step as I build it.

This question came up about a week and a half ago and it wasn’t directly asked of me, but I was intrigued enough to finally dig into it. This is something that’s come up in various projects for school and once in a hackerrank challenge for me. My brain likes to scream “There has to be a better way!” at me as I hack my way on through to get things done because I just don’t have the time to dig into it.

Continue reading “How do I efficiently calculate primes?”

Holy pictures, Batman!

Today I’m having flashbacks to when I tried designing this site with the pictures of mine I had on hand now and let me tell you, that was not a stellar experience. I have some great nature pics but nothing was composed quite how I needed it to be at the time. I’ve currently accepted that there aren’t fun pictures separating the sections but someday I might decide that I care again and when I do, what happens? I wasn’t sure until today when I found Unsplash. It’s an amazing collection of free pictures these gracious photographers have shared with us.

Continue reading “Holy pictures, Batman!”